
Thank you for selecting the One Happy Studio Elise theme. Following are the instructions for setting up your site to resemble the theme's Demo
If you have any issues with setting up the theme, please contact me.
I recommend having the demo open in another window/tab, to help you as you set up your site.
The setup has been broken into sections (click on the link to be taken directly to that section):
- Pre-Install Setup
- Theme Installation
- Plugins to Install
- Import the Demo Content
- How to Configure the Elise Theme Settings
- Set up Site Title & Description
- Import the Widget Settings
- How to set up the Home page
- How to set up the Menus
- How to set up the Primary Sidebar
- How to set up the Secondary Sidebar
- How to set up the Footer Widget Area
- How to set up the Category Archives page
- How to set up WooCommerce
Pre-Install Setup
Make sure you have installed latest versions of:
- WordPress (4.3+)
- Genesis Framework (2.0+)
Theme Installation
- Log in to your WordPress dashboard and go to Appearance > Add New Themes.
- Click the “Upload” link.
- Click the browse button and find the elise.zip file from your computer
- Click "Install Now"
- Click "Activate
Plugins to Install
These are the plugins used by the Elise theme. The links below will open in a new tab so you can keep this page open.
- Genesis eNews Extended - Email subscription widget (must be connected to a third party subscription service such as MailChimp)
- Genesis Responsive Slider - for the home page slider
- Gravity Forms - Your contact form (this is a premium plugin - I highly recommend it!)
- Contact Form 7 - A free plugin for a contact form (if you don't want to use Gravity Forms)
- Greg's Threaded Comment Numbering - Adds numbers to your comments section.
- Image Widget - If you prefer to add images via a plugin/widget, instead of using html.
- Regenerate Thumbnails - Once you have activated Elise, you will want to run this to resize your images.
- Simple Social Icons - Your social media icons.
- Genesis Simple Share
- Woo Commerce This is optional; for use if you want to have a shop
- Genesis Connect for WooCommerce
- Widget Import/Export - This will allow you to import the demo's widget settings.
- Alpine Photo Tile for Pinterest
Import the Demo Content
If you currently don't have content on your site, the demo content is available to help you visualize the way the site will display. This demo file includes dummy pages, posts, products, and menus.
In the theme's zip file, locate the XML folder, and unzip the demo.xml file. Follow these instructions to import the demo content.
Note that the images in the theme demo are *not* included in the demo file. There are placeholder images added to the XML file. The images are stock images, available through Adobe Stock.
Back to Top
Configure the Elise Theme Settings
In your WordPress admin dashboard , navigate to Genesis > Theme Settings. Configure the Theme Settings as follows:
Default Layout:
- Click a thumbnail to select the Default Layout. The Elise theme uses the Content > Sidebar option.

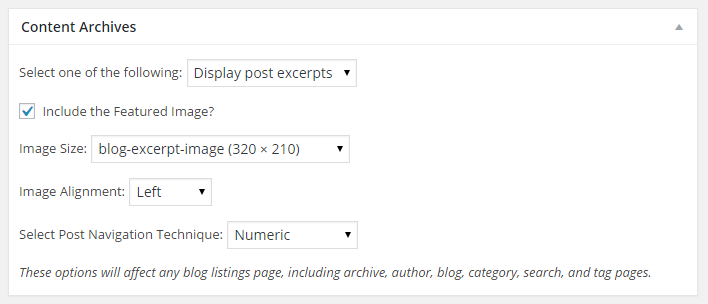
Content Archives
- For Content Archives, the default setting of “Display post excerpt” is used by the demo.
- Leave the “Limit content to __ characters” option blank or set to 0.
- Check the “Include the Featured Image?” checkbox,
- For Image Size select the featured image size of "blog-except-image".
- Image Alignment: Left
- Using the drop down box, select “Numeric” for the “Post Navigation Technique.”
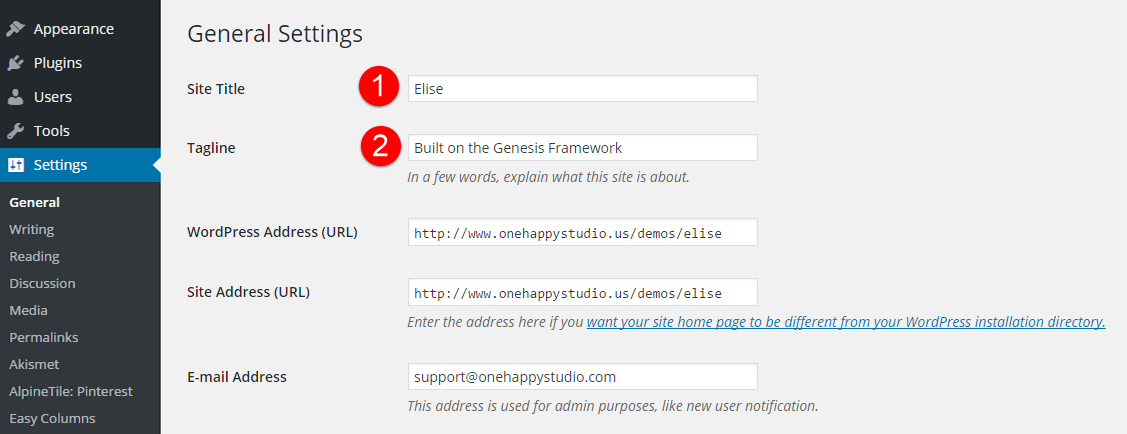
Set the Site Title and Description
Your site's title and description ("tagline") are set by navigating to Settings > General.
- Site Title will display in the upper left corner of your site.
- Tagline will display just below the Site Title
- Click the “Save Settings” button to preserve your changes.
Import the Widget Settings
The widget settings will automatically populate each of the theme's widget areas like the demo, making theme setup so much smoother.
- In the theme's zip file, locate the XML folder, and unzip the elise.wie file.
- Then, go to Dashboard > Tools > Widget Import/Export > browse for the .wie file > click "import"


Set up the Home Page
To set the number of post excerpts to display on the home page:
Navigate to Dashboard > Settings > Reading > set the "Blog pages show at most" to a number which is divisible by 3 (for example, 9, 12, or 15). This will ensure a balanced layout on your category archive pages.
Set up the Genesis Responsive Slider
Add the Genesis Responsive Slider to your Slider Widget (Dashboard > Appearance > Widgets > Genesis Responsive Slider
The slider uses the following settings: (click for image displaying slider settings)
- Maximum Slider Width: 800px
- Maximum Height: 400px
- After setting everything, save settings, and then
- Run the Regenerate Thumbnails plugin
For further tips and guidance on using the Genesis Responsive Slider, read this tutorial.
Set up Navigation Menus
The Elise theme has two navigation menus, with the Secondary navigation being "sticky". The navigation areas can be set by going to Dashboard > Appearance > Menus > Manage Locations. Set both the Primary & Secondary navigation to the menus of your choice in the drop downs. More information on creating and setting up a menu is available here.
Back to Top
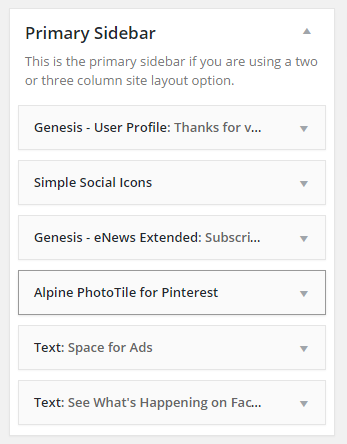
Set up the Primary Sidebar
The following widgets are used in the Primary Sidebar:
- Genesis User Profile
- Simple Social Icons
- Genesis eNews Extended plugin
- Alpine Photo Tile for Pinterest
- Text widget (for advertising)
- Text widget (for Facebook page)
Simple Social Icons Widget Settings:
- Background color: #ceb2b62
- Background hover color: #fea48f
Set up the Secondary Sidebar
The Elise demo uses a Content-Sidebar layout. For areas of the demo content set to display two sidebars, the demo uses the following Widgets in the Secondary Sidebar widget area:
- Shop Products Widget
- Archives Widget
- Categories Widget
- Text Widget

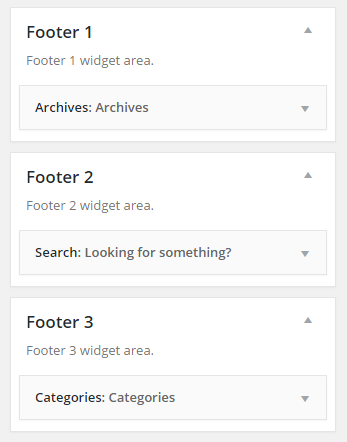
Set up the Footer Widgets
The theme has three footer widgets, which can be used to display your desired widgets. The demo displays the following widgets:
- Archives Widget
- Search Widget
- Categories Widget

How to set up the Categories Archive page
Your category archives will automatically display as large thumbnails. In order to ensure that all your images are evenly sized, you will need to update your Media Settings to set the thumbnails size.
- Go to Dashboard > Settings > Media Settings > Thumbnails.
- Set thumbnails to 250px by 250px.
- Check the box to "crop thumbnails to exact dimensions"
- Run the Regenerate thumbnails plugin
How to set WooCommerce
The theme is configured to be e-commerce ready, by using the WooCommerce and Genesis Connect for WooCommerce plugins.
Once you have installed the WooCommerce plugin, you will get a message at the top of your screen asking if you’d like to install pages. Follow the steps to setup the shop.
To configure your image settings so that your images aren’t blurry once you begin adding products. Navigate to WooCommerce > Settings > Products > Display and configure as you see below:
NOTE:
While this theme is styled to work with WooCommerce, support for WooCommerce is not included, due to the plugin being a third party plugin. Should you need further support for WooCommerce please visit here.
Enjoy!