

Starting a Blog: A step by step guide

In 2004, I started my first blog on the Blogger platform; it was a craft blog, mostly cross-stitching, but also other handcrafts. In 2012, I decided to move to the WordPress platform, with a self-hosted WordPress site, and since then I haven’t looked back. I no longer do crafts, but what I do is to help users get started with their own website. I write WordPress tutorials, and I provide theme support for Pretty Darn Cute Design, a WordPress theme developer. Additionally, I’m a StudioPress recommended developer. I wanted to share my experience in getting started by writing this guide – Starting a Blog: A step by step guide to launching your first website or blog
There are many website options out there to get started with your first blog, from Blogger to Wix, Weebly to SquareSpace, and WordPress, both wordpress.com and WordPress self-hosted. I recommend a WordPress self-hosted site for a number of reasons, not least of which is that it gives you the most opportunities for growth, on your own terms.
Starting a Blog: A step by step guide
Read More: What’s the difference between wordpress.com and wordpress.org
There are essentially three steps to get started with your website:
- Register a Domain
- Purchase Hosting
- Install WordPress on your hosting site
Starting a Blog: A Step by Step Guide – REGISTER A DOMAIN
For someone to access your website they need to type in your domain name in their browser’s URL bar. Computers communicate using an IP address, which looks something like 123.5897.72.032. If you type in the IP address that’s associated with your domain name you’ll end up seeing the same result as what you would see if you typed in your domain name.
But who wants to give out a string of numbers when you can have a cool domain name. The domain name is a user-friendly version of your site’s IP address.
A domain will typically cost you around $15 a year. Picking the perfect domain name is probably the hardest part of this process – you will want something which is unique, memorable, and reflective of your personality, or what you intend to blog about.
You can register your domain where you purchase your hosting package (selecting a hosting company, and choosing a package is up next…) or you can use a domain registrar to register the domain, and then choose a different company for your hosting company. For the purposes of this article, we’ll assume that you are going to purchase your domain at the same place as your hosting account. If you purchase your domain elsewhere, there’s an extra step to go through to get your website up and running, and I will be happy to answer any questions you have related to that at any time.
Starting a Blog: A step by step guide – SELECT A HOSTING COMPANY
A web hosting service is a service that will allow you to make your blog or website accessible via the web. We hosting companies provide space on a service, where all your files are located.
The number one recommendation which I have when choosing a hosting company is to purchase the best hosting you can afford. If you are just starting out on a small budget, I recommend Siteground; it’s shared hosting, which means that multiple sites share server space. This helps to keep costs down for you. Personally, I use and highly recommend WPEngine on my own website. It’s more expensive than Siteground, but it’s well worth it should your budget allow. I wrote an article about why I use WPEngine, which you can read to learn more about my decision. To keep things simple, however, we’ll use Siteground for the purposes of this guide.
Starting a Blog: A step by step guide
SETTING UP HOSTING AT SITEGROUND

I’ll walk you through the steps to get started with Siteground. I’ve broken it up into manageable steps – it might seem like a lot of steps, but in reality, it can all be accomplished in a few minutes
1. Click on this link to be directed to Siteground through my affiliate link. I will be paid a few dollars if you purchase hosting using my link (thank you – it’s affiliate income such as this which allows me to keep this blog running!). Click the “Sign Up” button.

2. Most hosting companies offer a number of plans, depending on your needs. The most basic one “Startup” will allow you to host one website. We’ll select that one; with rates starting at $3.95 a month, that’s less than $50 a year. (Siteground offer coupons throughout the year, and around Black Friday and Cyber Monday, you can often find rates of up to 70% off for your first year.) Click “Order Now“.

Starting a Blog: A step by step guide

3. If you’ve already purchased your name, select the I already have a Domain radio button, and type in your domain URL. Otherwise, if you haven’t yet purchased a domain, click Register a New Domain, and type in your desired domain name. Click Proceed. Siteground will advise you on the next page if your domain is available.

4. Enter your account information, and payment details.

5. Continue down to the “Purchase Information” section. Select your preferred term; Siteground offers a minimum of 12 months of hosting, up to 36 months. Some hosting companies offer further discounts if you select a longer term. With Siteground, it’s the same monthly price for 36 months as it is for 12 months, so we’ll just select the 12 month period. The checkbox for Domain Registration is automatically checked. You can choose Domain Privacy if you wish, but this is optional. Check that you understand the terms of service, and then click “Pay Now”

Starting a Blog: A step by step guide – INSTALLING WORDPRESS
6. Refer to the email which has been generated to you to set your password. Once your password has been set, you can log into your account.

7. After logging in, you’ll be taken to your Dashboard. Click on the “My Accounts” tab.

8. From My Accounts, click on the orange “Go to cPanel” button

9. Scroll down to the AutoInstallers field, then click on the WordPress icon

10. On the WordPress Installation screen, click “Install.”

From the Software Setup page:
- select your domain from the dropdown (if you have more than one domain),
- add a site name,
- and description (this is your tagline). You can change your site name and description later, so don’t stress about coming up with a site description now.
- In the Admin Account section, create a user name
- Create a strong password
- Add in notification email
- Click “Install”.

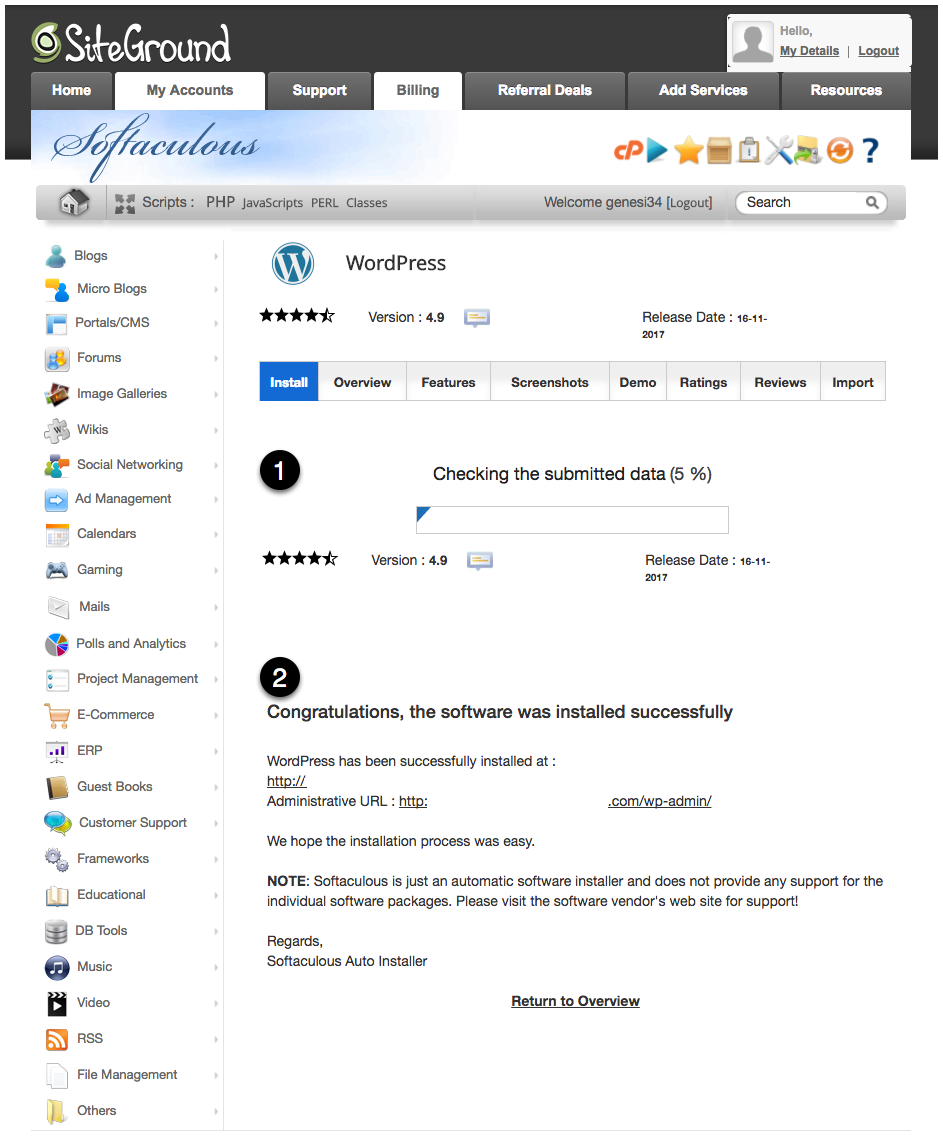
11. After selecting Install on the previous screen, you’ll see the “progress bar” (#1 below) which shows you that WordPress is being installed. Once it’s installed (#2), you’ll receive confirmation of the successfully installation, together with a link to your website. Click on the “Administrative URL” link, which will take you to your WordPress website.
12. Enter your user name and password which you added when you installed WordPress.

13. You will now see your WordPress dashboard. You’re done! Congratulate yourself, pat yourself on the back, grab a coffee (or diet coke in my case!), and write your first post – you’ve just published your first blog! This is where the fun begins…

Starting a Blog: A step by step guide – CHOOSE YOUR THEME
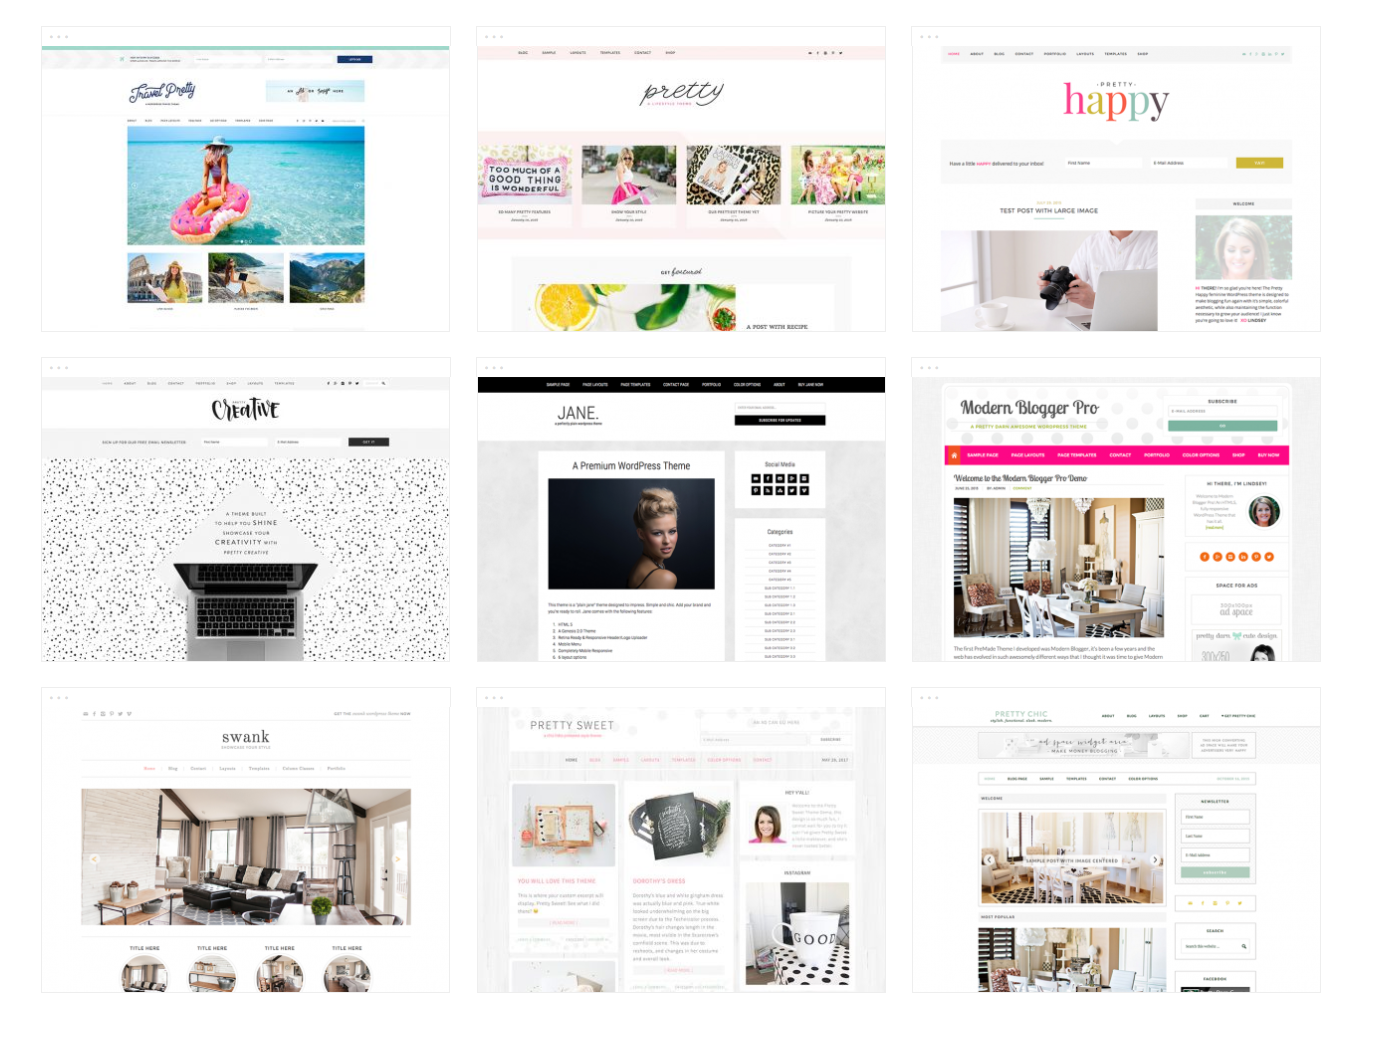
Once you have WordPress installed, there will be three “default” WordPress themes already in your dashboard. You can choose to use one of those themes, or you may have another theme in mind.
I work exclusively with the Genesis Framework, and I love the themes by StudioPress and Pretty Darn Cute Design (where I provide all Lindsey’s theme support and customizations). I highly recommend taking a look at the themes by StudioPress and Pretty Darn Cute Design for something a little nicer than a default WordPress theme.
Lindsey is offering a special coupon code for $15 off a Pretty Darn Cute Design theme for Black Friday through Cyber Monday.
Use this link to view the themes, and the Coupon Code: prettythankful
details: $15 OFF ANY THEME PURCHASE
I also develop themes, so take a look at my Elise and Happy School Days themes for more options:

Just in time for Black Friday comes this special offer from StudioPress – new customers can save 25% off any theme (including the Genesis Framework)

Need help? Have a question?
Are you anxious to get started with your own website, but don’t have the time (or inclination)? I can do it all for you. My services include:
- Entire Website setup (purchase of domain & hosting; installation of WordPress, the Genesis Framework and the child theme of your choice)
- 24 hour theme setup (use this if you have already purchased your domain & hosting, and have WordPress installed)
- Theme tweaks (if you want something a little beyond the basic setup)
- WordPress one-on-one training
- Fully custom website/blog
This post contains affiliate links. For more information about what that means, see my disclosure here


Thankn you for sharing this because I had No idea all that went into a blog.
Justin – as a follow-up to your Facebook post; if you are just looking for something which is free and easy to get started, a wordpress.com blog might be all you need. I work with WordPress self-hosted sites, which are designed for people who are looking to monetize their blogs, or sell products etc. For simple personal blogging, this may be more than you need or are looking for. I’m happy to help you get started with wordpress.com if you’re interested…